LTI 1.3 Registration Guide: How to convert from 1.0 to 1.3
Welcome to the new IMS LTI 1.3
To get started on moving your school to the new system, there’s a few things you should know.
-
This change is much needed and the updates can open further, more powerful integrations in the future. It also provides much better security between you, your LMS provider, and Magna’s LTI Tool.
- Also the LMS system’s our current instructors utilize will depreciated 1.0 in the coming months, this change will assure that our LTI Launch Tool’s don’t break along with it.
- The only thing that is changing is how we set up our connection between the LMS and Magna. Once this is set up, there should be no more configuration on your side. The user will still just click on the launch link the tool provides.
- This change also fixes a few bugs. Our biggest change is making sure that opening the tool in an iframe will still keep the user logged in. Before, we had instructors having the link open up in a new tab, this change will fix that.
-
The one time setup of 1.3 is a little bit trickier than our last integration.
- Before: Magna provided you with a consumer key and secret to launch the LTI Tool.
-
For this setup:
- we will provide you with a set of URL’s you will add to your LMS System when creating the Magna LTI Launch Tool.
- In return, your LMS will generate a set of URL’s and ID’s which you will provide our Magna system through a link we setup.
- A more detailed explanation on steps are below but that’s the gist of it.
Steps to converting your 1.0 Magna LTI Launch link to 1.3
The following guide shows the steps to configure several popular LMS to work with the Magna Campus LTI Tool. If your LMS is not listed here, consult your LMS vendor on how to configure LTI application. Regardless of the LMS, the typical workflow should remain the same:
- Use the Magna Campus LTI Tool parameter’s below to configure your Magna Campus LTI Tool.
- Configure an LTI tool on the LMS using the parameters from step 1.
- Obtain parameters from the configured LTI tool.
- Configure Magna Campus LTI Tool using the parameters from step 3.
The configuration steps slightly differ depending on the LMS you are using. In general, they will involve registering the Magna External LTI Tool as an external tool in the LMS and registering the parameters of external tool back in the Magna Campus LTI registration page. The following examples show how to configure Magna Campus LTI Tool with three of the popular LMS.
Configuration:Take the values above and set up a 1.3 Magna Launch Link through your LMS provider.
-
Moodle:
- Open your LMS and sign in with the admin account.
-
Click Site administration from the left navigation pane.
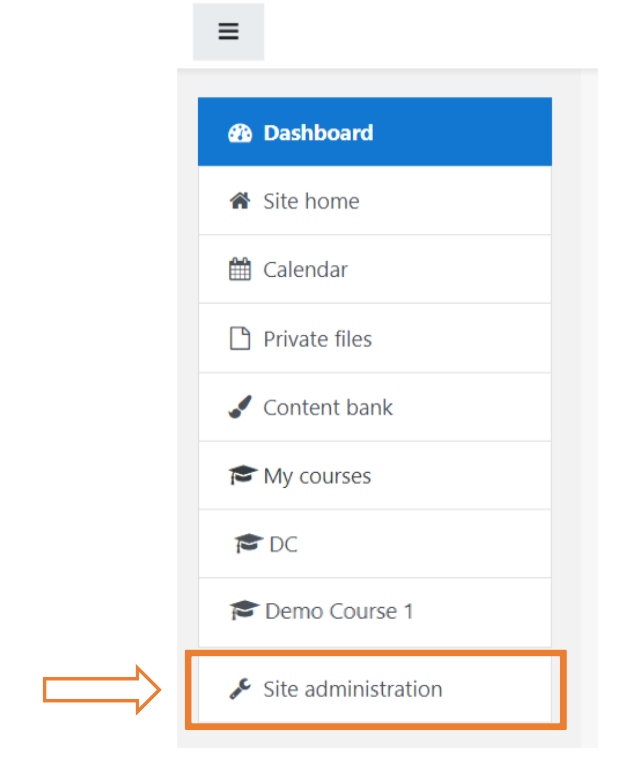
-
Select Plugins.
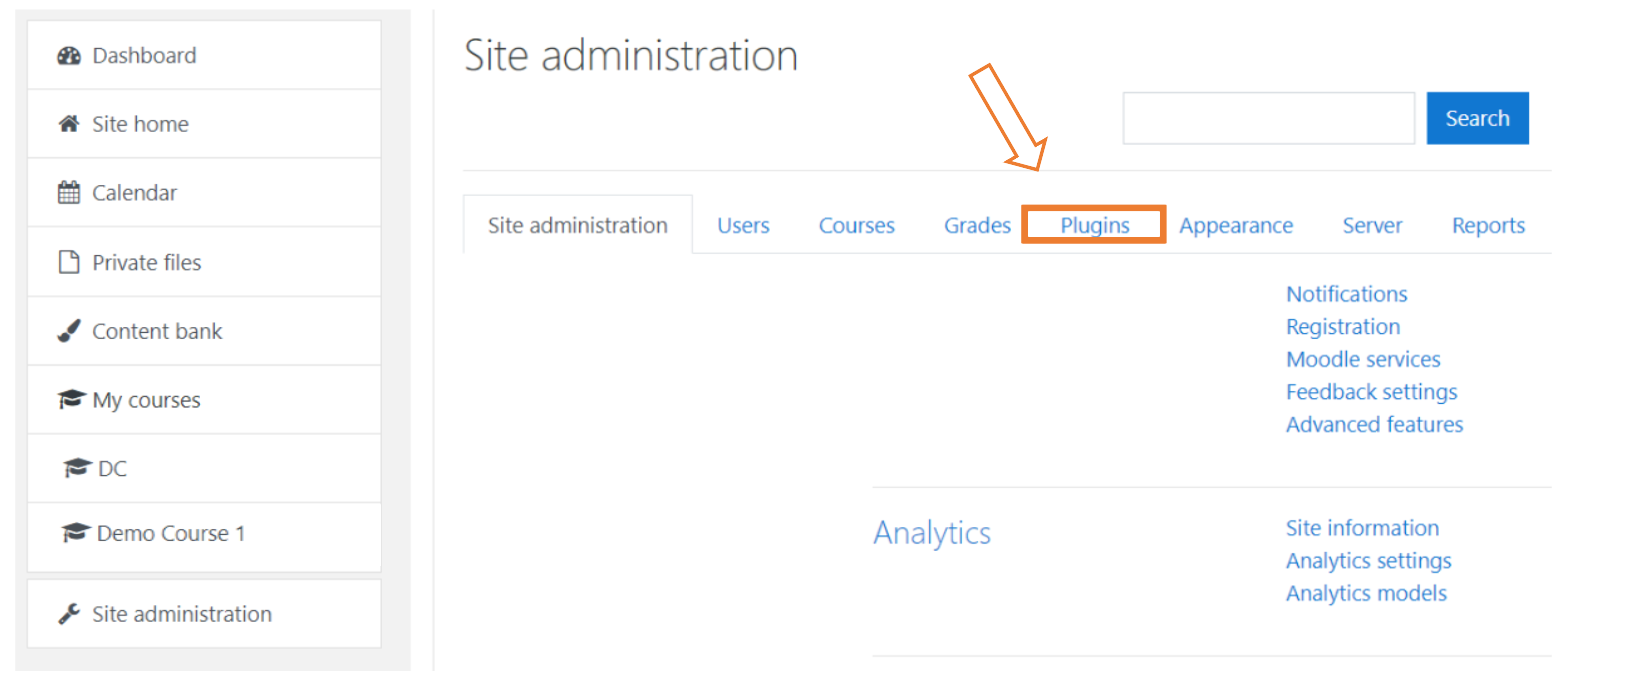
-
Under Activity modules, click Manage tools.
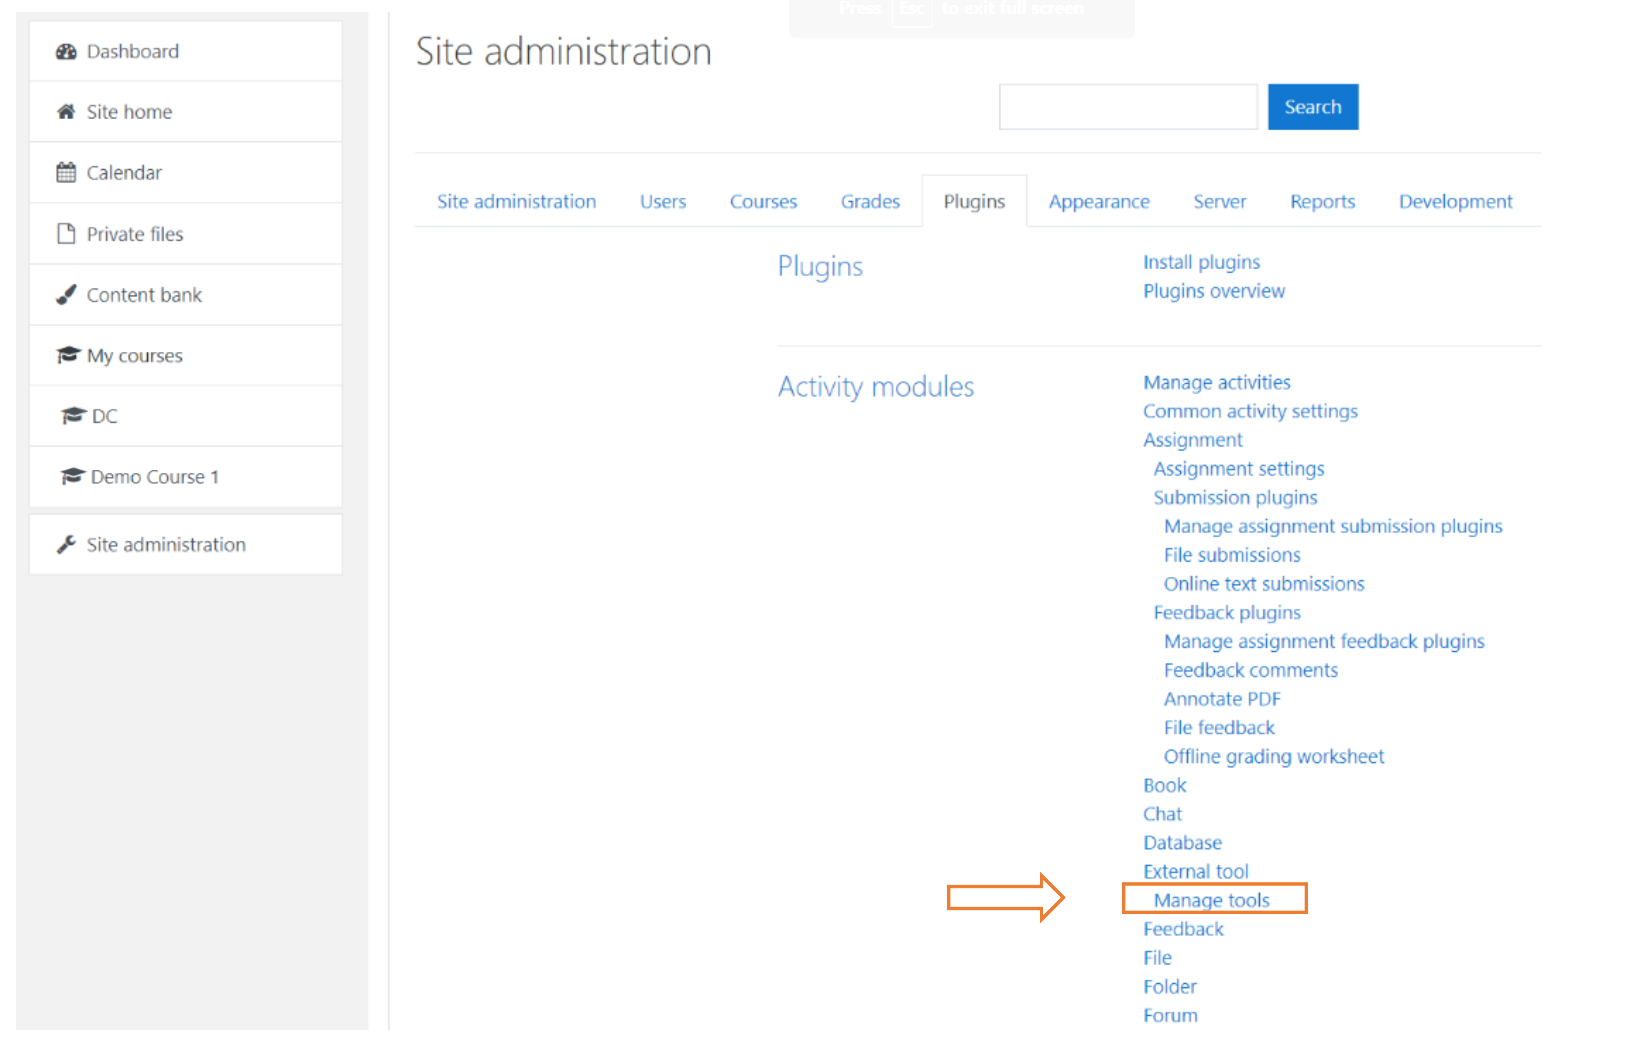
-
Using Moodle's Dynamic Registration
-
Enter in the Moodle Dynamic Registration URL.
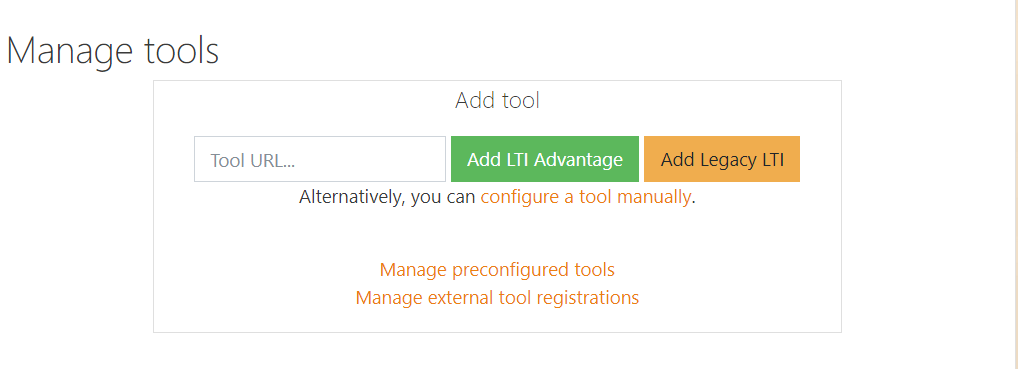
- Click the green Add LTI Advantage button.
-
You’re all set! The Magna Campus LTI Tool should be registered and connected to your LMS. Go ahead and test the tool through clicking the link on the LMS side.
-
Enter in the Moodle Dynamic Registration URL.
-
Or if you would like to manually configure the tool:
-
Click configure a tool manually.
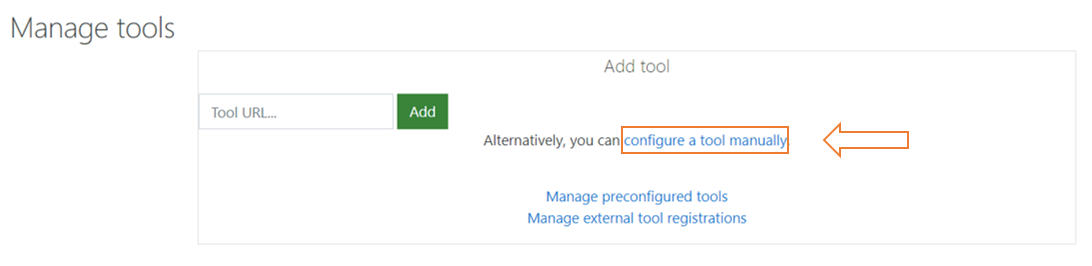
-
Enter the following information:
- Tool name: give the tool a name of your choice. For example: “Magna Campus 1.3 LTI Tool”.
- Tool URL: enter the “Launch URL” from the Magna Campus LTI parameters above.
- LTI version: LTI 1.3
- Public key type: Keyset URL
- Public keyset: enter the “Keyset URL” from the Magna Campus LTI parameters above.
- Initiate login URL: enter “Login URL” from the Magna Campus LTI parameters above.
- Redirection URI(s): enter the “Launch URL” from the Magna Campus LTI parameters above.
-
Under Privacy, select the following options:
- Share launcher’s name with tool: Always
- Share launcher’s email with tool: Always
- Click Save changes. The tool should now appear and listed with the name you provided.
-
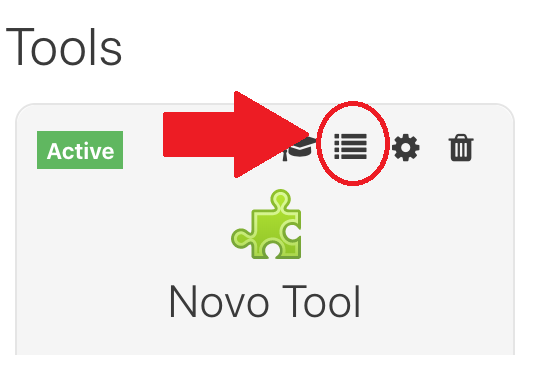
Click the icon on the tool that represent View configuration details.
-
Take note of the following parameters:
- Platform ID
- Client ID
- Deployment ID
- Public keyset URL
- Access token URL
- Authentication request URL
- Login to the Magna Campus LTI Registration page with your consumer key and password and enter in the values above.
-
Click configure a tool manually.
-
Canvas:
The LTI 1.3 and LTI Advantage platform requires a tool to be initially configured in the Developer Keys page, followed by being added to an account or course. First, configure the tool in the Developer Keys page.
- Open your LMS and sign in with the admin account (Users who want to manage Developer Keys must have the Developer Keys - manage permission).
- Click Admin from the left navigation pane, then click the name of the account.
- Click Developer Keys.
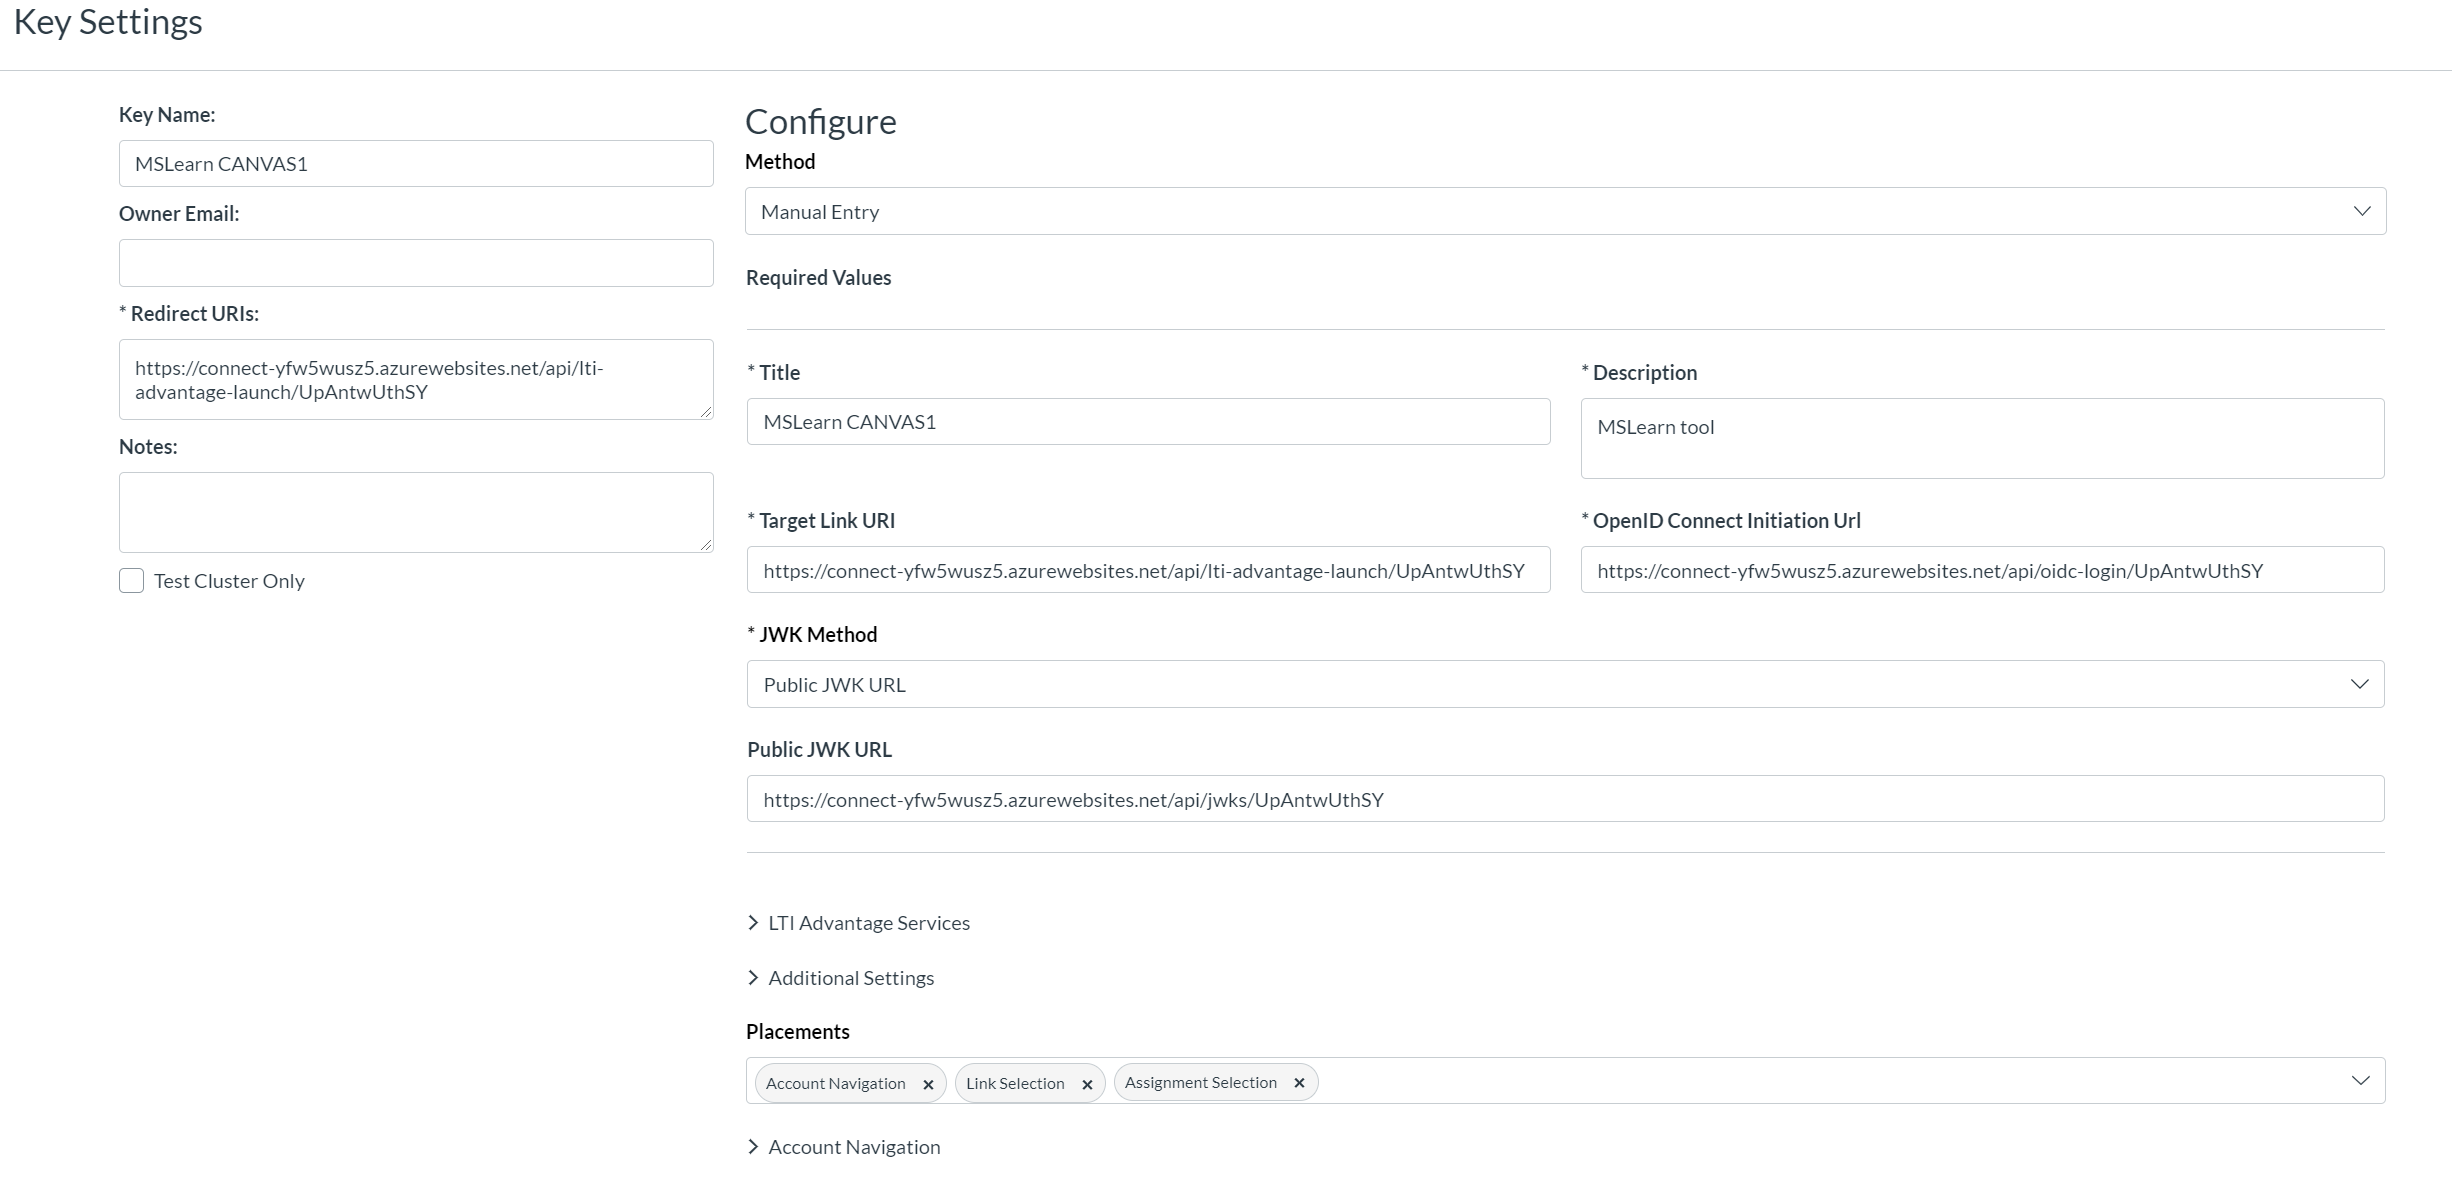
- Click +Developer Key and click +LTI Key.
-
Enter the following information:
- Key Name: give the tool a name of your choice. For example: “Magna Campus 1.3 LTI Tool”.
- Redirection URIs: enter the “Launch URL” from the Magna Campus LTI parameters above.
- Method: select Manual Entry
- Title: give the tool a title.
- Description: give the tool a description.
- Target Link URI: enter the “Launch URL” from the Magna Campus LTI parameters above.
- OpenID Connect Initiation URI: enter “Login URL” from the Magna Campus LTI parameters above.
- JWK Method: select Public JWK URL
- Public JWK URL: enter “Public JWK Set URL” from the Magna Campus LTI parameters above.
-
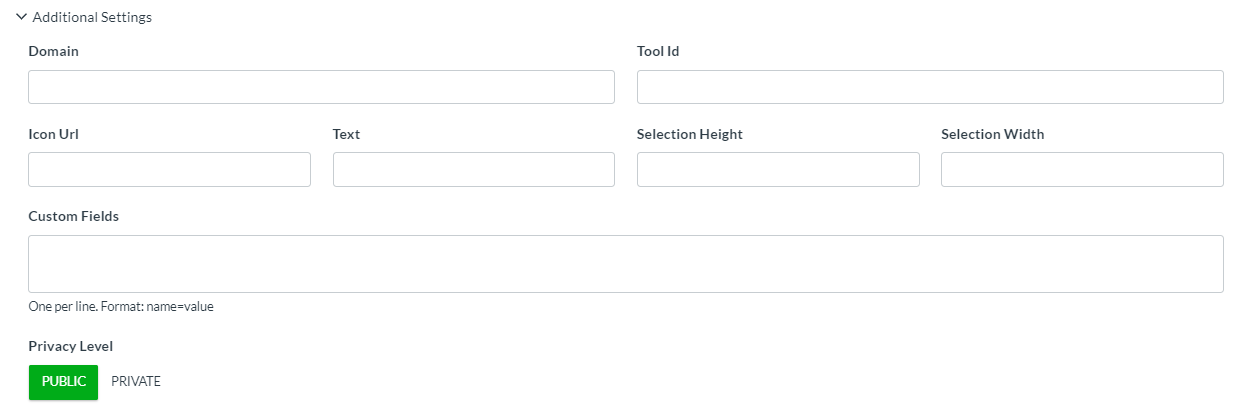
Under Additional Settings, select the Privacy Level as PUBLIC.
- Click Save. The key should now appear and listed with the name you provided.
- Ensure that the newly added key is set to Enabled.
-
Take note of the following parameters:
-
Client ID: the number in the Details column, above the Show Key button

-
Client ID: the number in the Details column, above the Show Key button
At the account level, external tools must be installed in the External Apps page in Account Settings. LTI Advantage apps can be added via the Client ID option. Only the Client ID is required to be added.
- Click Settings from the left navigation pane.
- Click View App Configurations.
- Click +App.
-
Enter the following information:
- Configuration Type: select By Client ID
-
Client ID: enter the “Client ID” from the LTI key registration.
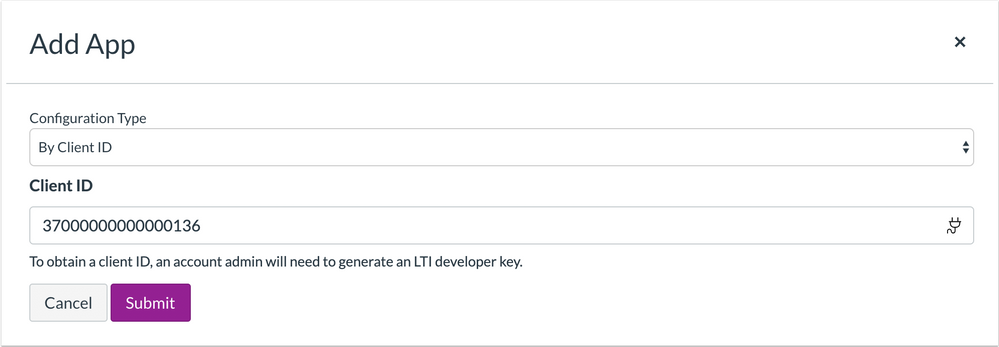
- Click Submit.
-
If the Client ID is associated with an external tool, the tool name displays in the page. The page also confirms the tool should be installed.

- Click Install.
-
Take note of the following information:
- Display name: give the tool a name of your choice.
- Platform ID: enter https://canvas.instructure.com
- JWK Set URL: enter https://[tenant-name].instructure.com/api/lti/security/jwks
- Access Token URL: enter https://[tenant-name].instructure.com/login/oauth2/token
- Authorization URL: enter https://[tenant-name].instructure.com/api/lti/authorize_redirect NOTE: [tenant-name] is where your Canvas tenant name hosted by instructure. For example if the url of the LMS is https://canvas.instructure.com, then the [tenant-name] is “canvas”. If you are using self-hosted Canvas, replace https://[tenant-name].instructure.com with your canvas URL.
- Client ID: enter “Client ID” from the LTI key registration.
- Deployment ID: 1
- Login to the Magna Campus LTI Registration page with your consumer key and password and enter in the values above.
-
Blackboard:
Before the LTI Tool can be added to specific Blackboard Learn LMS Tenant, it needs to be registered as an app in Blackboard Dev Portal.
- Open your browser and go to https://developer.blackboard.com/.
- Click Register to Register and Manage Your Applications.
- Accept the Terms & Condition and click Agree & Continue.
- Create a New Account to register your application. If you already have an account, sign in with one.
- Click the + icon to register a new application.
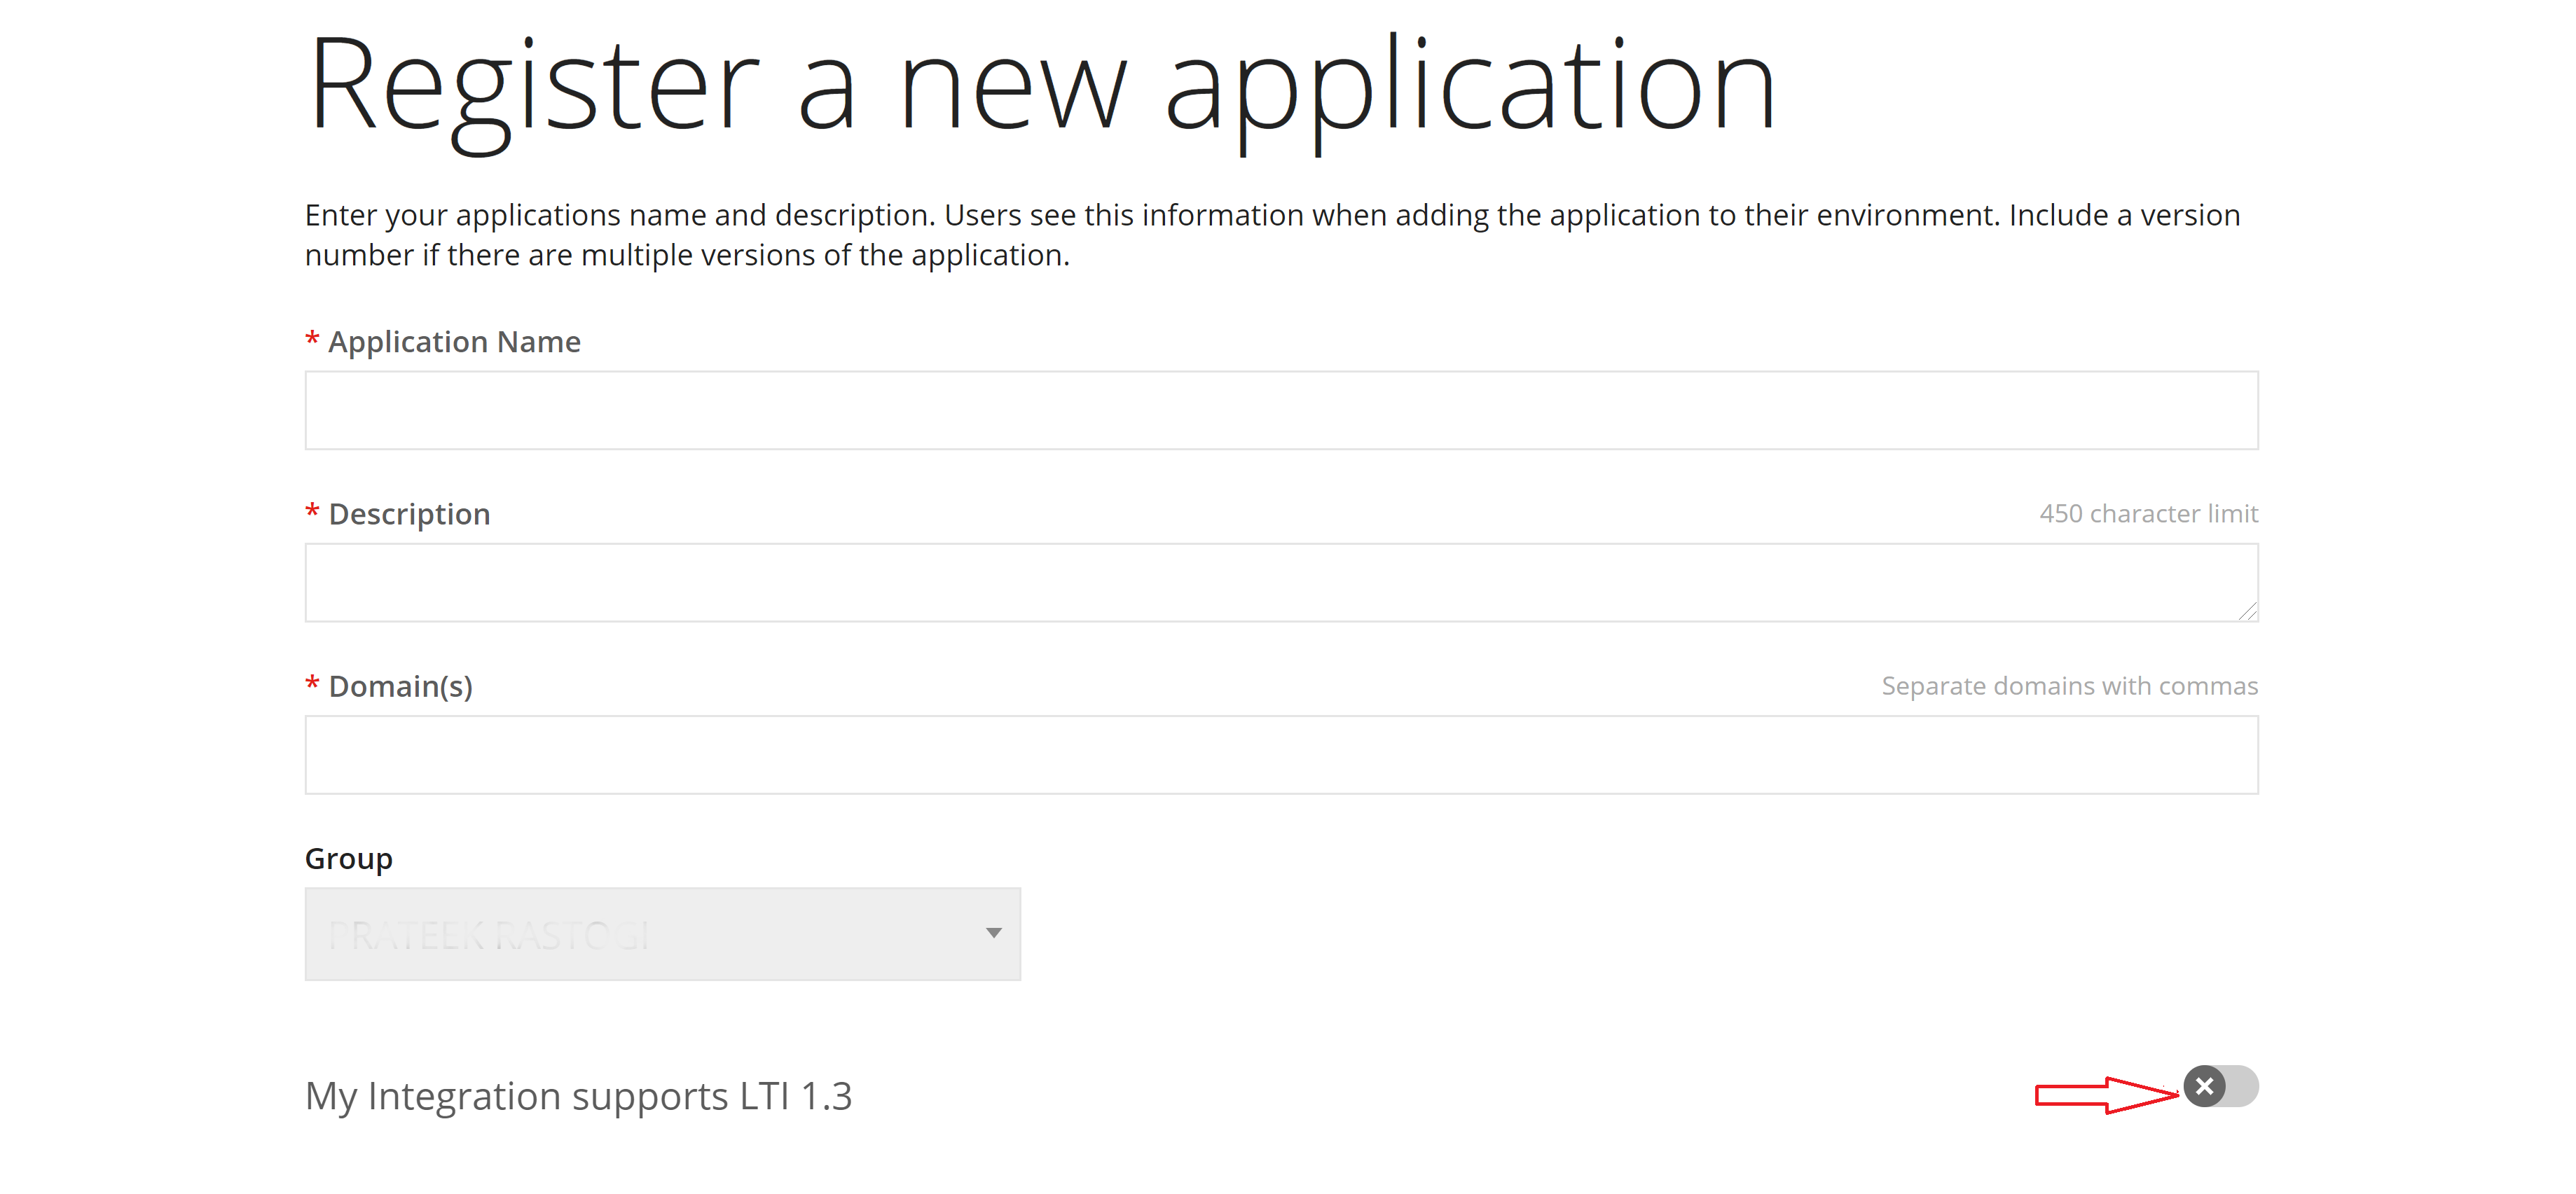
-
Enter the following information:
- Application Name: give the tool a name of your choice. For example: “Magna Campus LTI 1.3 Tool”.
- Description: give the tool a description.
- Domain: enter “Launch URL” from the Magna Campus LTI parameters above.
-
My Integration supports LTI 1-3: Enabled.
- Login Initiation URL: enter “Login URL” from the Magna Campus LTI parameters above.
- Tool Redirect URL(s): enter the “Launch URL” from the Magna Campus LTI parameters above.
-
Tool JWKS URL: enter “Public JWK Set URL” from the Magna Campus LTI parameters above.
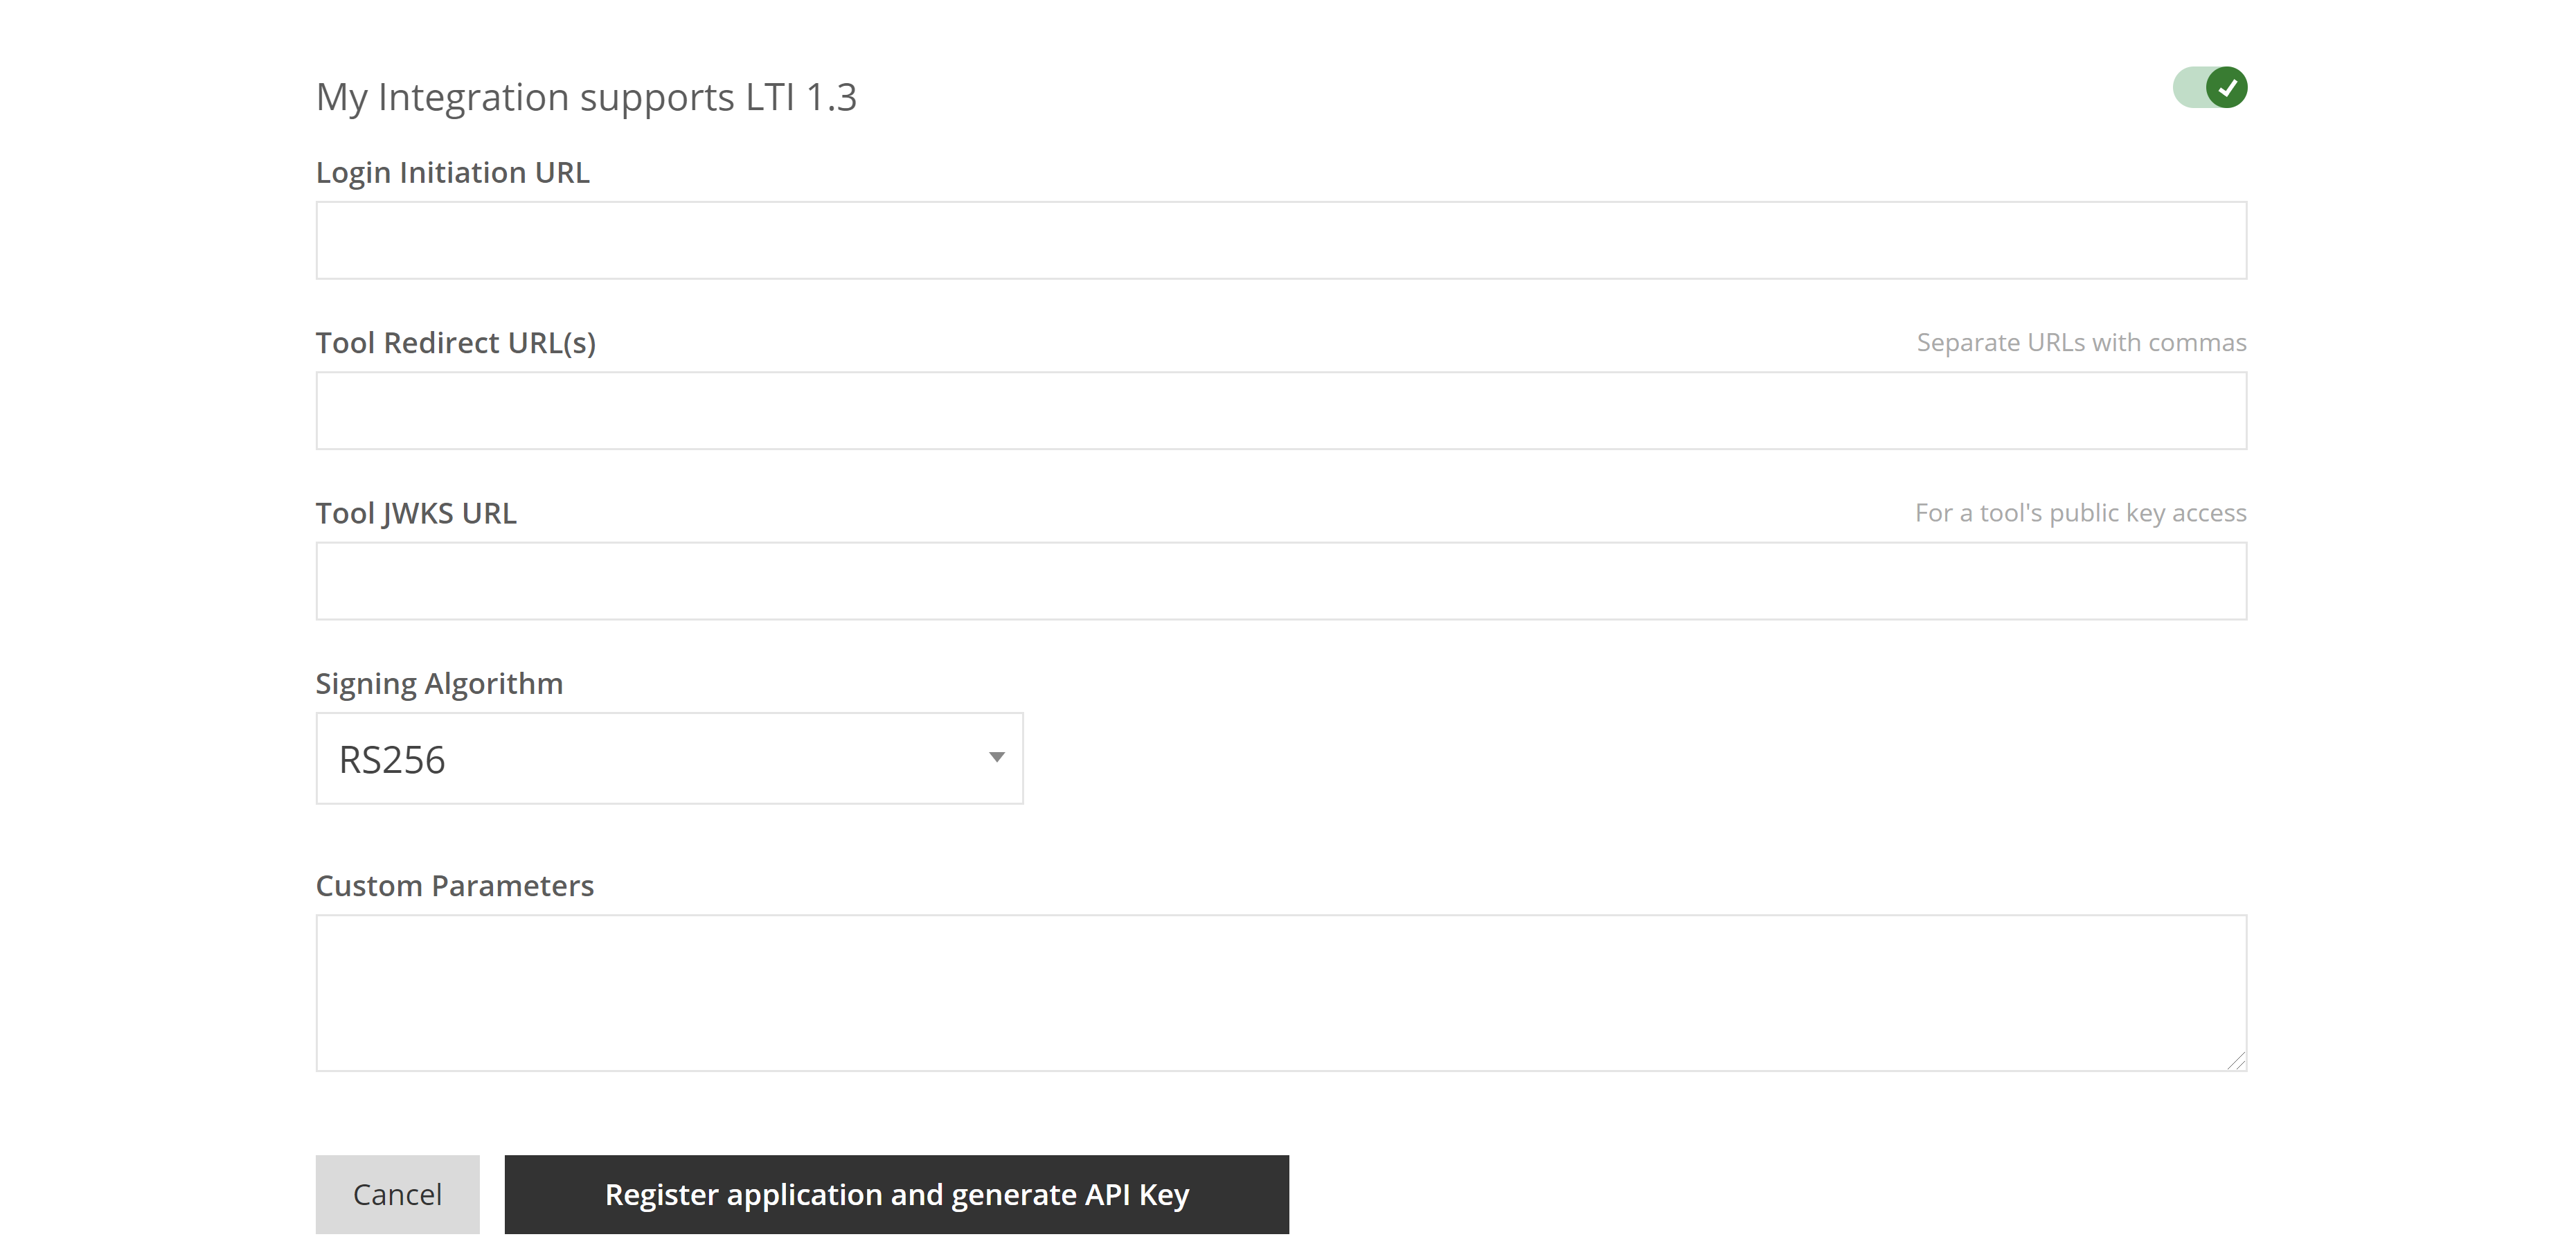
- Click Register application and generate API Key.
- Note: The secret is only shown once. Make note of the application key and secret and store them in a safe and secure location.
-
Take note of the following parameters:
- Application ID: the string under the Application ID column.
Now you are ready to add the app as an LTI Provider in your Blackboard Learn LMS.
- Open your LMS and sign in with the admin account.
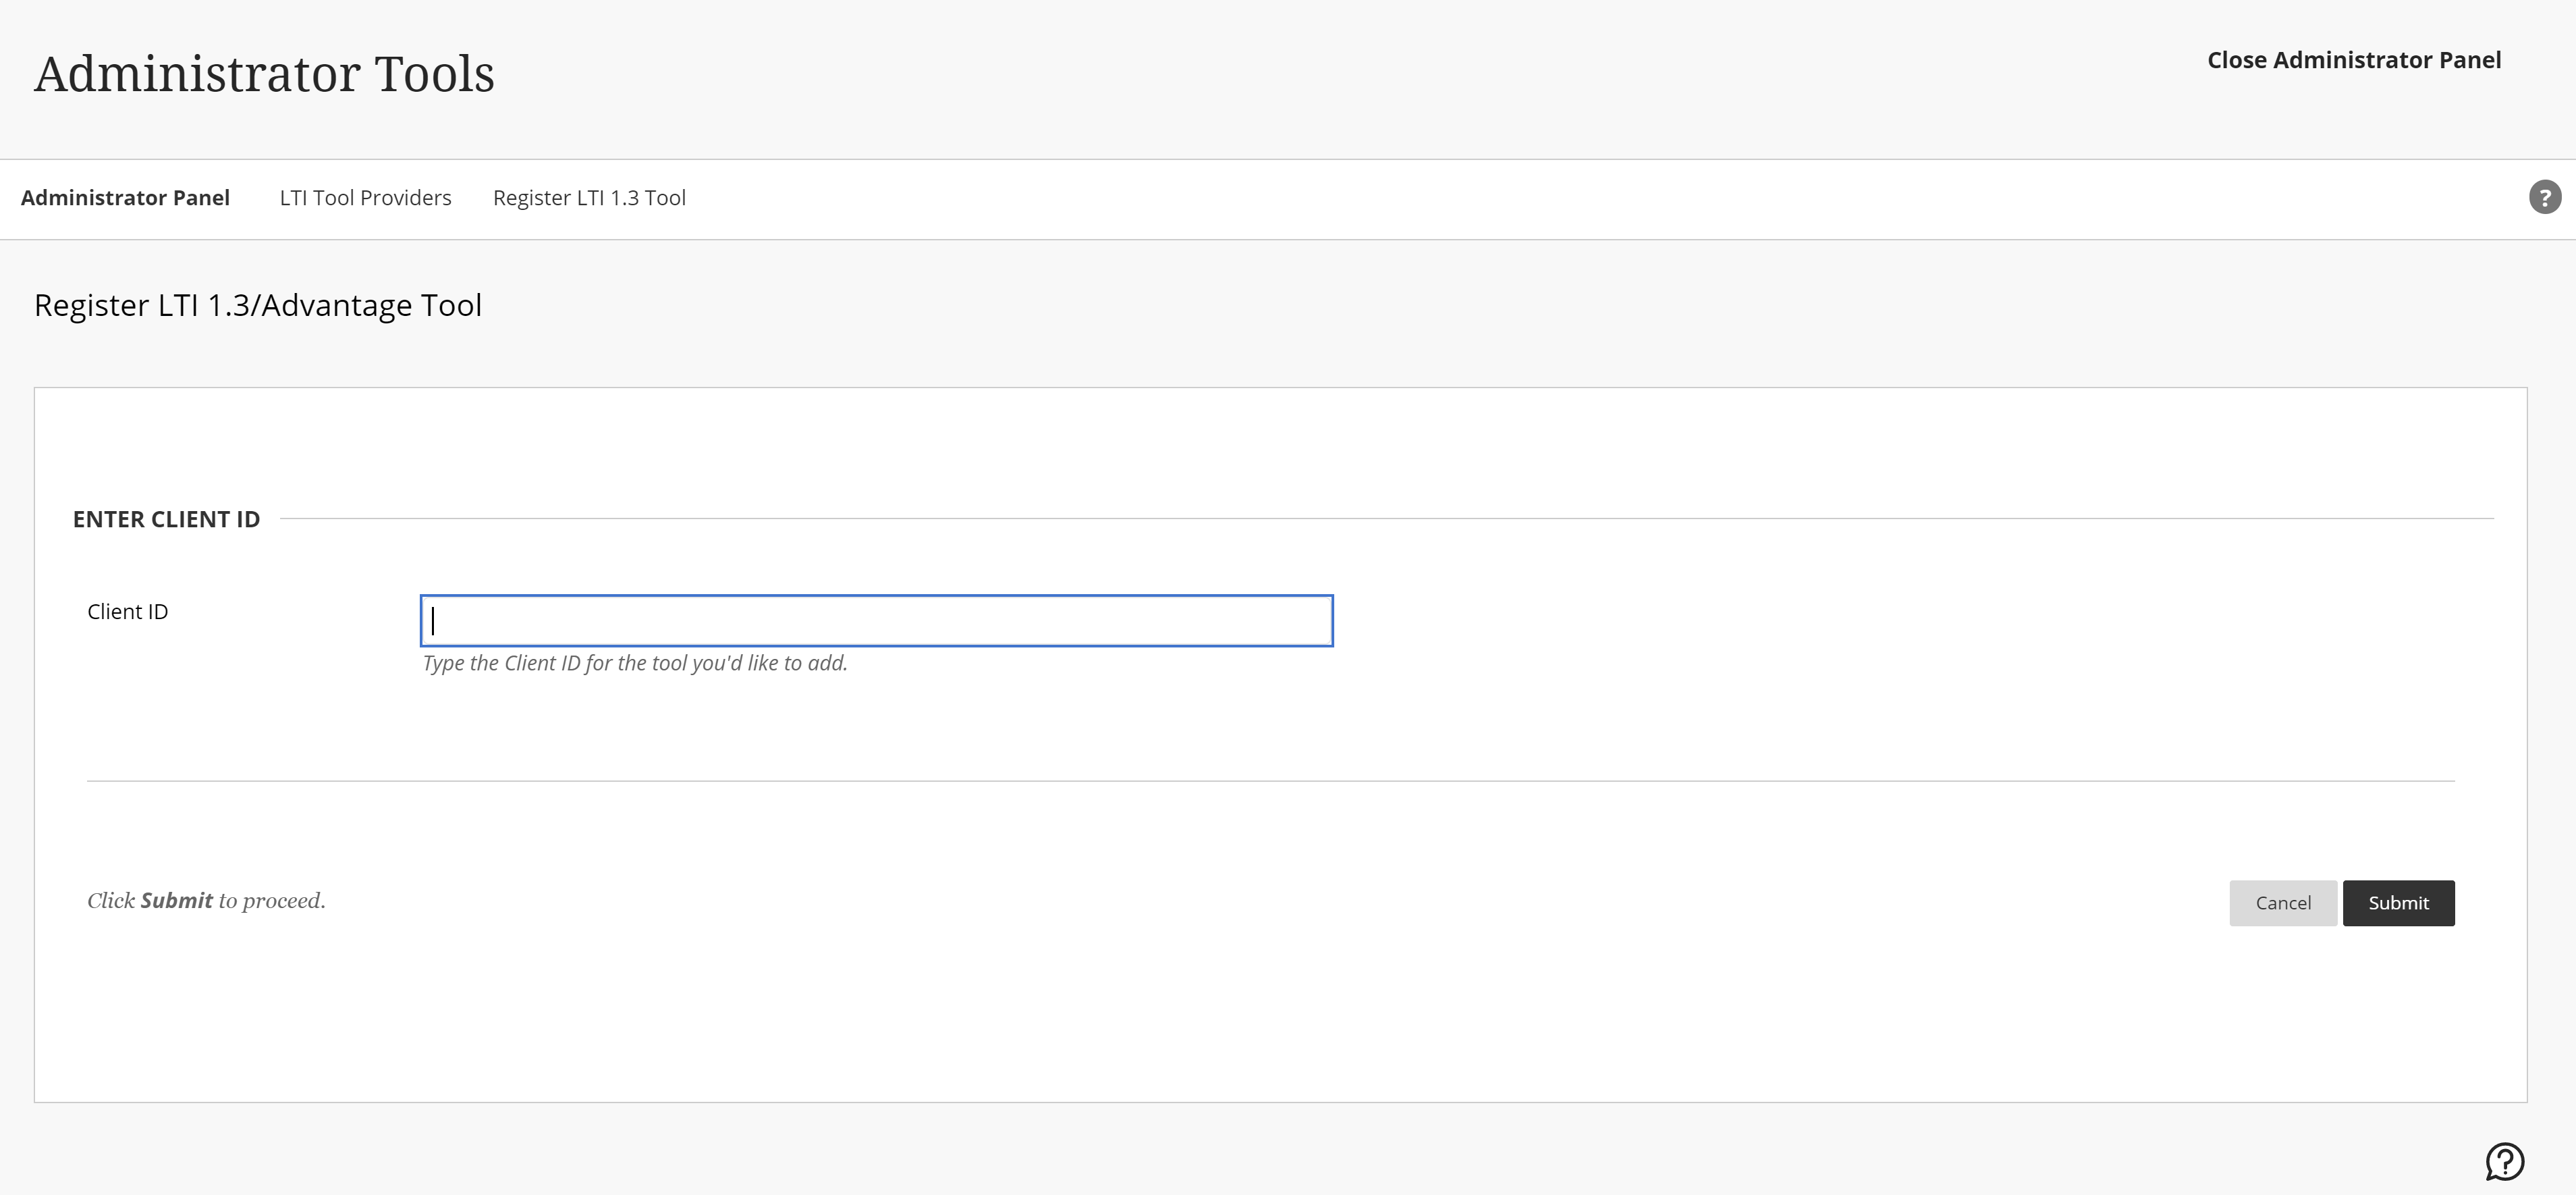
- Click Admin from the left navigation pane to open the Administrator Panel.
- Click LTI Tool Providers under Integrations.
- Click Register LTI 1.3/Advantage Tool.
-
Enter the following information:
- Client ID: enter the “Application ID” from the LTI key registration.
-
Click Submit.
- Ensure that Tool Status is set to Approved.
-
Under Institution Policies:
- Ensure that all User Fields to Send are selected.
-
Click Submit.

- Select the newly registered tool and click Manage Placements.
- Click Create Placements.
-
Enter the following information:
- Label: give the placement a label. For example: “Magna Campus LTI 1.3 Tool”.
- Handle: give the placement a handle.
- Availability: Yes
- Type: Course content tool
- Target Link URI: enter the “Launch URL” from the Magna Campus LTI parameters above.
- Click Submit.
-
Take note of the following information:
- Platform ID: enter https://blackboard.com
- JWK Set URL: enter https://developer.blackboard.com/api/v1/management/applications/[application-id]/jwks.json, where [application-id] is the “Application ID” from the LTI key registration.
- Access Token URL: enter https://developer.blackboard.com/api/v1/gateway/oauth2/jwttoken
- Authorization URL: enter https://developer.blackboard.com/api/v1/gateway/oidcauth
- Client ID: enter “Application ID” from the LTI key registration.
- Deployment ID: 1
- Login to the Magna Campus LTI Registration page with your consumer key and password and enter in the values above.
You’re all set! The Magna Campus LTI Tool should be registered and connected to your LMS. Go ahead and test the tool through clicking the link on the LMS side.